


React testing is the process of testing your React components and applications to make sure that they work properly and meet the desired requirements. Testing our React components and applications involve running various tests to make sure that they work correctly. This ensures that our application behaves as intended, and that users can interact with it without encountering errors or bugs.

Why Testing?
Testing is a means of verifying that the code behaves as intended by the developers. Testing is done to ensure that our app will work as intended for our end users. Having tests will make our app more robust and less error prone. It is a way to verify that the code is doing what the developers intended.
What is Testing?
Testing is a 3-step process that looks like this:

Arrange: In this step, you set up the preconditions for the test. This may involve initializing objects, setting values, and configuring the environment.
Act: In this step, you perform the action that you want to test. This might involve invoking a method or function, interacting with a UI element, or manipulating data.
Assert: In this step, you verify that the outcome of the action is what you expect it to be. This may involve checking the value of a variable, examining the state of an object, or comparing the actual results to expected results.
Types of Testing in React
There are essentially three types of testing for React components:
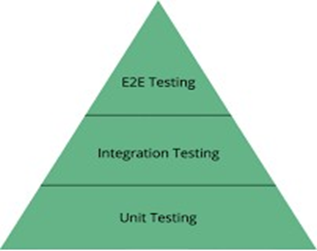
Unit testing: Rendering component trees in a simplified test environment and asserting on their output.
Integration testing: Test’s the interactions between the various components of an application.
End to End testing: Running a complete app in a realistic browser environment.
Rendering component trees tests the output of a given component. The test is written to simulate the event or rendering, and the expected output is “asserted”. The actual output (within the test environment) is then compared to the asserted output, and the test passes or fails.
Whereas, end-to-end testing is done in a browser environment, and tests the entire workflow of a web application, from start to finish. We have used Unit Testing for testing the Citron repository because it helps us to detect errors faster and increases code readability.
Tools for Testing in React
During our testing we have used React testing library and Jest for testing different components of our app.
React Testing Library is a set of helpers that let us test React components without relying on their implementation details. This approach makes refactoring easy and also encourages us towards best practices for accessibility.
Jest is a JavaScript test runner that lets us to access the DOM via jsdom. It provides a great iteration speed combined with powerful features like mocking modules and timers so you can have more control over how the code executes.
React Testing Components with Jest
Jest is a popular testing framework for React that is simple and powerful enough to write and execute unit tests in React. Jest offers a variety of features for testing React components, such as mocking, snapshot testing, and more.
Now, let’s perform testing of React Components with the help of Jest. In this example, we shall test the ‘HelloWorld’ component which contains the text ‘helloworld’.
Step 1: Install Jest
npm install --save-dev jest
Step 2: Write a Test
Create a .test.js file and paste the following test script inside the file. Write the test with the ‘it’ or ‘test’ function offered by the Jest library.
import React from 'react';
import { render } from '@testing-library/react';
import HelloWorld from './HelloWorld';

test('renders a message', () => {
const { getByText } = render(<MyComponent message="Hello, World!" />);
const messageElement = getByText(/Hello, World!/i);
expect(messageElement).toBeInTheDocument();
});
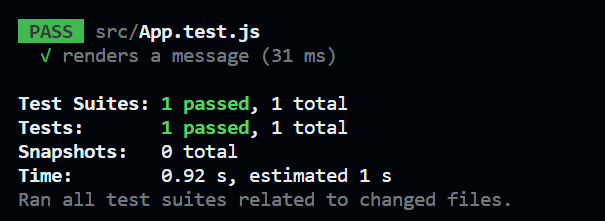
Step 3: Execute the Test
To execute the test, run the following command in the terminal. In this test case, we tested if our application contains the ‘helloworld’ text.
npx jest HelloWorld.test.js
Snapshot Testing
Snapshot testing is generally performed for the testing purposes of the user interface. While running the Snapshot test, Jest creates a series of components compared with the previously saved snapshot. If the snapshot matches the previous one, the test passes otherwise, the test fails.
First Install the latest version of React test renderer with the following command:
npm install react-test-renderer
Let’s write a Snapshot test for the previous test.
import React from 'react';
import renderer from 'react-test-renderer';
import HelloWorld from './HelloWorld';

test('renders correctly', () => {
const component = renderer.create(<HelloWorld />);
const tree = component.toJSON();
expect(tree).toMatchSnapshot();
});
Mocking Dependencies
Mocking dependencies is the procedure followed to ensure the system under test is isolated from external dependencies or interaction with other modules by replacing the module’s implementation or a function with the mock implementation we define.
Let’s consider a practical example of how to mock dependencies in Jest.
const fetchUser = async (userId) => {
const response = await fetch(`https://api.example.com/users/${userId}`); const data = await response.json();
return data; };

const fetch = require('node-fetch');

jest.mock('node-fetch');

describe('fetchUser', () => {

it('returns the user data', async () => {

const mockResponse = { name: 'example' };

fetch.mockResolvedValueOnce({

json: jest.fn().mockResolvedValueOnce(mockResponse),

});

const result = await fetchUser(123);

expect(fetch).toHaveBeenCalledTimes(1);

expect(fetch).toHaveBeenCalledWith('https://api.example.com/users/example');

expect(result).toEqual(mockResponse);
});

});
In this example, jest.mock() is used to mock the node-fetch module.
Then, in the test, fetch.mockResolvedValueOnce() is used to create a mock answer for the fetch() call inside of fetchUser().
Basic Terminologies in Testing
1. it or test: is defined as a function that takes two parameters: a name or description of the test, and a function that contains the actual test code. The function that holds the test code uses assertions or matchers to test the behavior of a particular component.
2. describe: It takes two parameters: name of the test suite and a callback function. It is used to define a test that contains many unit tests.
3. expect: is a function that allows you to check if your code behaves as expected. It takes one or more arguments and returns an object with a variety of methods (“matchers”) that can be used to make assertions.
4. matcher: is a function that is used with the expect function to make assertions about the behavior of the code being tested. Each matcher checks if a certain condition is true or false and returns a value that indicates if the assertion passed or failed.
5. render: refers to the process of creating a virtual representation of a React component in memory. This allows us to test the behavior of the component without actually rendering it in a web browser.
6. screen: object provides a set of helper functions that can be used to interact with the rendered React components during testing
7. cleanup: is used to remove any resources created during testing by resetting the DOM and ensures that the component is properly unmounted.
8. beforeEach: is used to set up any necessary state or resources that will be used by the tests.
9. afterEach: is used to clean up any state or resources that were set up during the tests.
10. fireEvent: is used to simulate user interactions with the rendered React components during testing.
Installation
Step 1: Install React testing library dependencies.
npm install --save-dev @testing-library/react @testing-library/jest-dom
@testing-library/react: the core dependency that install react testing library.
@testing-library/jest-dom: is a virtual DOM for jest that allow us to use custom jest matchers to extend jest with RTL. The matchers allows our tests to be more declarative, clear to read & maintainable.
Step 2: Install Jest dependencies.
npm install --save-dev jest jest-environment-jsdom
Step 3: Importing Jest from react testing library.
import '@testing-library/jest-dom'
Step 4: Run your Test Files.
npm test
My Learnings
React testing can be challenging, but it is an essential part of building high-quality applications. By writing comprehensive tests for our React components, we can catch bugs and issues early in the development process, which can save time and resources in the long run.